2 Day Yosemite Itinerary: How to Spend a Weekend in Yosemite National Park

Thinking about spending a weekend in Yosemite? This Yosemite National Park itinerary not only shows you the best way to spend 2 days, but also gives you practical information so you can plan your perfect Yosemite trip.
Yosemite National Park is one of the most renowned national parks in the United States. It is the 6th most visited national parks in the United States, greeting over 4 million visitors each year (pre-pandemic).
Located in the eastern side of Central California, Yosemite National Park is famed for its granite peaks, powerful waterfalls, giant sequoia groves and amazing views. It is a paradise for families, hikers and climbers with its wide array of things to do.
One of the most famous hikes in the United States, Half Dome hike, is located in Yosemite National Park and if you are on social media, you may also be familiar with the “firefall” at Yosemite that happens every February.
Regardless of your physical ability, you can enjoy a Yosemite National Park weekend trip.
I have visited Yosemite National Park twice, the first time when I was in high school with a Chinese bus tour (which resulted in me seeing almost nothing). The most recent time, I was able to visit Yosemite properly, so this 2 day Yosemite itinerary will include everything we did as well as useful tips from our trip.
This blog contains occasional affiliate links, where I receive a small commission on sales of the products/hotels that are linked at no additional cost to you. In addition, as an Amazon Associate, I earn from qualifying purchases.

How to Get to Yosemite National Park
Located in the heart of the Sierra Nevada mountain range, Yosemite National Park is the perfect long weekend trip from Central and Northern California.
Below are some time estimates to get to Yosemite from major cities in California. The estimates below are to the Yosemite Valley area of the park with minimal traffic:
- San Francisco to Yosemite: 191 miles, 4 hours by car
- San Jose to Yosemite: 188 miles, 4 hours by car
- Sacramento to Yosemite: 166 miles, 3.5 hours by car
- Modesto to Yosemite: 120 miles, 3.5 hours by car
- Bakersfield to Yosemite: 200 miles, 4 hours by car
- Lake Tahoe to Yosemite: 208 miles, 4.5 hours by car
As you will see below, there are different areas and entrances to Yosemite National Park. Therefore, depending on which area of Yosemite you want to visit, your travel time will differ by 20 to 30 minutes at least.
There are public transportation options available to get to Yosemite without a car, such as YARTS bus, Amtrak and Greyhound. You can read about them more here.
Yosemite Map: Different Areas of Yosemite National Park
You may wonder why it’s important to know about the different parts of the park for your 2 day trip to Yosemite. I mean, isn’t everything just together?
I honestly did not know anything about Yosemite until a few weeks before our trip, and man, I found out the hard way that you really gotta know which area of the park you are going to in order to book hotels!
Keep in mind that Yosemite National Park covers a large area (1,187 square miles to be exact), and you will most likely only be visiting a tiny part of the park. For instance, 99% chance you will not be visiting the wilderness of Yosemite north of Tioga Road (Hwy 120).
You can see the map of Yosemite National Park below.

There are 4 major areas in Yosemite:
- Tuolumne Meadows: East side of Yosemite, enters through the Tioga Pass Entrance. It is known as the high country with high elevation at around 8,600 feet. It is most famed for Tuolumne Meadows, the blue Tenaya Lake and Olmsted Point for a stunning view. This area is closed in the winter, making it impossible to enter Yosemite from the east side from November to May.
- Wawona: South side of Yosemite, enters through the South Entrance. It is known for Mariposa Grove, with over 500 giant sequoias. The Mariposa Grove Road is closed in the winter, but you can still enter from this entrance since the Wawona Road is open all year round.
- Yosemite Valley: The valley in the middle of Yosemite, the most popular area of Yosemite to visit. This area is where you can see the towering peaks, waterfalls and other famous views of Yosemite National Park. It is open all year round.
- Mather Districts: The North East side of Yosemite, includes the Hetch Hetchy and Big Oak Flat entrance. Not as many people go there. It includes more remote terrains, a reservoir, Crane Flat meadows, etc.
Bonus Area: Glacier Point. Although not a “major area” on its own, Glacier Point is about an hour drive from Yosemite Valley. Famed for its direct view of Half Dome and a few nice hikes, Glacier Point is closed to vehicles in the winter (November to May) but can be accessed for skiing.
For your 2 days in Yosemite National Park, we will be focusing on the Yosemite Valley and Glacier Point area.
2 Day Yosemite Itinerary: Overview
This Yosemite itinerary will be split into two parts: Yosemite Valley and Glacier Point.
All the activities will be in these specific areas to save you from driving back and forth. This itinerary for a weekend in Yosemite also includes some hikes, feel free to swap out the hikes for an easier walk or other family friendly activities if you don’t hike.
Day 0: Arrival to Yosemite
Day 1 in Yosemite: Yosemite Valley for viewpoints and hikes
Day 2 in Yosemite: Glacier Point and viewpoints, hikes near Glacier Point
This Yosemite itinerary assumes you have almost 2 full days in Yosemite, with you leaving the national park at the end of Day 2 and arriving the night before Day 1.
This itinerary can be done over the weekend if you are driving in on a Friday, just keep in mind that traffic to Yosemite on a Friday afternoon is very bad (as we have experienced first hand).
In addition, the 2 day itinerary for Yosemite assumes you are visiting between May and October, when all the roads and hiking trails are open.

Park Pass and Reservation for Yosemite National Park
Reservation is required to drive into or through Yosemite National Park from spring to fall. This is to reduce congestion at the park during peak season.
Reservation system is not new to Yosemite National Park as it had implemented a reservation system in the previous years. It was only in 2023 that the park did not have a reservation system, and to be honest, it led to severe congestion and parking issues in the park (how did I know? Because I went there without reservation!)
Keep in mind the following dates that you need a reservation for Yosemite in 2024 from 5am to 4pm:
- April 13 to June 30: Reservation is required on Saturday, Sundays, and holidays (May 27 and June 19)
- July 1 – August 16: Reservation required everyday
- August 17 – October 27: Reservation is required on Saturday, Sundays, and holidays (Sep 2 and oct 14).
If you enter the park before 5am or after 4pm during these dates, or you visit the park before April 13th or after October 27th, you do not need a reservation.
You can make your Yosemite Reservation at the recreation.gov website starting January 5 at 8am PST. Each reservation is $2 and valid for 3 days.
Besides a timed reservation, you also need to have an Entrance Pass ($35 for private vehicle) to enter Yosemite. You can pay online or in person with credit card (no cash accepted). You can also use America the Beautiful pass to enter.
How to Get Around Yosemite National Park
There are many ways to get around Yosemite, which include but not limited to:
- Bike around Yosemite Valley
- Drive
- Free Yosemite park shuttle bus
- Commercial tours
The Free Yosemite Park shuttle bus is something you should pay special attention to, as you will most likely be utilizing this bus.

If you are planning to spend the day in Yosemite Valley (like Day 1 on this Yosemite itinerary), then utilizing the shuttle to get around to different viewpoints and hikes is the best option for you to get around.

In general, most people park their car in one of the three parking areas (Yosemite Village, Curry Village, or Yosemite Falls), then hop on the free shuttle to different stops in the valley. There are two routes of this free shuttle bus and they both operate from 7am to 10pm.
- The green route is a valleywide shuttle that covers the entire Yosemite Valley. It takes about 1.5 hours to do the entire loop.
- The purple route only covers the East Valley, which includes campgrounds, Mirror Lake, Happy Isles and Curry Village and Yosemite Village.
Therefore, if you want to do most of the sightseeing, you will need to take the green route. The bus stop signs are very obvious so it should be quite easy to find the bus.
Currently Bus Stop #2, #4, #5, and #19 are temporarily closed.
For your second day in Yosemite at the Glacier Point area, you will need to drive or take a Glacier Point Tour. Personally I would recommend driving up to Glacier Point so you can go to the different viewpoints and take your time.
There are a number of other shuttles and hikers buses available at Yosemite, mostly in the summer. This Yosemite itinerary does not cover those areas, but you can find out more about transportation options on the official nps website.
2 Days in Yosemite: Itinerary in Detail
Without further ado, let’s dive right into this super detailed weekend trip guide for Yosemite. Again, you can modify this to suit your needs, swap out hikes for more viewpoints or something.
Day 0 in Yosemite: Arrival
Since this itinerary assumes you have almost 2 full days in Yosemite, it is essential that you arrive the night before. Keep in mind that if you are driving to Yosemite from the Bay Area on a Friday afternoon, you will probably hit traffic, adding 1-2 hours to your travel time.
I flew into SFO Friday noon, hoping to make it to Yosemite before sunset to hike to Taft Point, but it actually took us almost 6 hours to get to Yosemite that day because of all the Friday traffic and of course, accidents, on the highway.
Unless you are driving to Yosemite in the morning, I would not advice planning anything in the park that day to avoid disappointments.
Day 1 in Yosemite: Yosemite Valley + Hikes
Assuming you have arrived at Yosemite (or nearby) the evening before (or super early in the morning today if you really can’t make it the night before), you will be spending your first day in Yosemite Valley, the single most popular area in Yosemite National Park.
As the name implies, Yosemite Valley is a valley. This means that it is surrounded by towering peaks and waterfalls from these peaks. In the Yosemite Valley you have access to restaurants, campgrounds, lodges, and of course a ton of viewpoints and hiking trails.
Below are my suggestions on viewpoints and hikes you should do on your first day in Yosemite.
Be aware that this will be a very long day, especially if you plan to hike. If you can’t do everything on this list, you can always do some of them on your second day in Yosemite.
Park Your Car at Yosemite Village
Arrive at Yosemite Village bright and early (hopefully by 6:30 or 7am). Park your car at the parking lot before it gets too full during the day.

Lower Yosemite Falls
Shuttle Stop: Stop 6 on the Green Route
You can take the shuttle or just walk 15 minutes to the start of Lower Yosemite Falls trail. Don’t let the word “trail” scare you, as this is not a hike.
Lower Yosemite Falls trail is a family friend mostly flat stroll from the bus stop towards the foot of Yosemite Falls. Yosemite Falls is the tallest waterfall in North America and this waterfall has 2 parts, an upper part and a lower part.


This trail allows you to get close to the base of the Lower Fall, which is about 320 feet tall (98 meters). The best thing about this walk is that you are facing Yosemite Fall the entire walk, making it one of the most beautiful and effortless walks in the park.
However, if you don’t really care to get that close to the waterfall, simply take some photos with the waterfall in the background. The reason I put this as the first thing for you to do during your weekend in Yosemite is so you can get nice photos without anyone around.
This place gets super packed later in the day and doesn’t get empty until 5 or 6pm. I went in the afternoon and could not get a shot without people unfortunately. But if you don’t care for photos without people, you can always move this to later in the day since you will be back at Yosemite Village after your hike.
Hike the Mist Trail to Vernal Fall and Nevada Fall
Shuttle Stop: Stop 16 Happy Isles/ Mist Trail
From Lower Yosemite Fall, I highly suggest that you walk back to Yosemite Village and hop on the purple route to Happy Isle (stop 16).
The reason for this is that the Yosemite Valley shuttle goes one way counterclockwise, since the drive around Yosemite Valley is also one way. Since Happy Isle stop is east of Yosemite Village the green shuttle would need to make an entire loop, which can take an hour to get to Happy Isles.
Therefore, it is a lot more efficient to walk back to Yosemite Village and take the purple shuttle to Happy Isles. Or you can drive to Curry Village and take the purple shuttle but I don’t really suggest doing that.


The Mist Trail is probably the most popular hiking trail in Yosemite National Park, because you get to see not one, but two amazing waterfalls on this trail. This trail is also the first part of the hike to Half Dome, so you will see a lot of hikers on this trail super early in the morning.
The Mist Trail can be broken down into 3 parts:
- The footbridge to see Vernal Falls for those with small children that cannot hike further
- Vernal Fall where you can hike very close to the fall or go above the fall <Yellow Trail>
- Nevada Fall for those who want to go above a much taller waterfall <Pink Trail>
Vernal Fall is where you have to hike up a series of steps while being sprayed by the powerful waterfall early in the summer. Many people stop here and turn back around.
Nevada Fall is the second and the taller waterfall on the Mist Trail. It is a lot steeper (Vernal Fall is steep already), and takes longer to get to.

If you want to hike both waterfalls, it will take you 5-6 hours round trip, depending on your physical conditions and how much time you spend at the waterfalls. If you just want to do Vernal Fall, then it will take about 3 hours round trip. I did both waterfalls and thought it was well worth the effort.
Read my complete guide to hiking the Mist Trail for more information.
When you do the Mist Trail, always stay behind the railings near the waterfalls and do not ever get into the water to cool yourself down. There have been fatal accidents at the waterfalls because of irresponsible actions, the hike itself is not dangerous at all.
Lunch at Village Grill
Shuttle Stop: 2
Regardless of how much you want to hike on the Mist Trail, it is time for lunch after the hike! Unless you brought your own lunch to eat on the trail, take the shuttle back to Yosemite Village.
You have a number of options at Yosemite Village, and for this particular itinerary, I would suggest eating at Village Grill.
Most of the seats for this restaurant are outside, so it is a nice way to relax and breathe in the fresh air during lunch. Also remember to get their watermelon wedges if you are visiting in the summer, they are extra refreshing after hiking!
Sentinel/Cook’s Meadow Loop & Sentinel Bridge
Shuttle Stop: 6
If you haven’t already visited the Lower Yosemite Falls trail, you can do that after lunch. If you have already, you can either walk or take the shuttle to shuttle stop 6 and explore the meadow area called Sentinel/ Cook’s Meadow Loop.
This is a really nice flat meadow area where you can take a walk along the road to get some nice views of Yosemite Falls, Glacier Point, Sentinel Rock and Half Dome. There usually aren’t too many people around since it’s a big area, and you will see families riding bicycles and even people with strollers.


There are 4 really nice photo spots in the Sentinel/Cook’s Meadow Loop, and that was the main reason for our visit:
- Cook’s Meadow
- The Boardwalk
- Yosemite Chapel
- Sentinel Bridge

In the map above, I mapped out the route you can take when exploring the Cook’s Meadow:
- Red Route is the actual Sentinel/ Cook’s Meadow Loop
- Navy Route is the extended route you can take to see the Sentinel Bridge, the Yosemite Valley Chapel and the Boardwalk.
One option is to just do the red route to walk the 1 mile Sentinel/ Cook’s Meadow Loop, then hop on the shuttle from Stop 6, go west along the Northside Dr. to explore the rest of Yosemite Valley before coming back to Southside Dr. and see the boardwalk.
However, because the shuttle would only drop you off at the Four Mile Trailhead (shuttle stop 11) along the Southside Dr, you will have to walk to almost a mile to the boardwalk, then walk more to the chapel, Sentinel Bridge and back at Shuttle Stop 6 Lower Yosemite Falls.
Therefore, I think it’s better to do the loop (the red part) and the navy colored extended walk to see the boardwalk, chapel and Sentinel Bridge at the same time.
The boardwalk does not have a sign and it actually took us a while to find it (and almost giving up). You can spot the “heart” on the map above on Southside Dr, that is where the boardwalk is. The coordinates for the boardwalk is 37°44’19.0″N 119°35’43.6″W.


When we visited this boardwalk on a Saturday afternoon in August, it was not crowded at all! So I don’t think you need to rush to get here, since not as many people come here compared to the Lower Yosemite Fall trail.


As you walk around the meadow and explore, you may notice there are people canoeing and kayaking on Merced River. If you didn’t want to hike the Mist Trail, you can totally do a kayaking or canoeing tour instead.
Explore Other Yosemite Viewpoints
After you make your way back to the shuttle stop, hop on the green shuttle to go west along the Northside Dr. If you don’t want to take the shuttle, you can also drive but the risk of not finding parking at these viewpoints is always there.
All of these are very quick photo spots, so you will be actually spending most of the time getting there.
El Capitan Meadow & Yosemite Valley View (Shuttle Stop 8)

Shuttle Stop 8 is a quick stop for you to take photos of El Capitan Meadow and Yosemite Valley View. As the name implies, El Capitan Meadow allows you to have an up close view of the mighty El Capitan and Cathedral Rocks.
Yosemite Valley View is located nearby, giving you a majestic view of the Yosemite Valley with the granite peaks lining up on both sides. This spot is next to the river, making it a great place to relax and take in the view.
Bridalveil Falls & Hanging Valley Viewpoint (Shuttle Stop 10)

The shuttle doesn’t really drop you off at Bridalveil Falls viewpoint, so you will need to walk 5 to 10 minutes to reach these two viewpoints. There are also parking at these viewpoints, but when I went it was super packed, so one of us had to jump out of the car just to grab a photo while the other (me) waited in the car.
Anyway, the Bridalveil Fall is one of the highlights of Yosemite, with its maximum height at 620 feet (189 meters). You can do a 0.5 mile round trip walk to see the Bridalveil Fall from the base of the fall, or you can just grab a photo from the road.
Cathedral Beach (no shuttle stop)
If you have your own car, you can probably stop at Cathedral Beach for a quick look, but if you are on a shuttle, it may not be worth it for you to come here.

Essentially there is a small body of water (hence the beach) and many families stop here for picnics or grills or just playing in the water.
Swinging Bridge (Shuttle Stop 11)
Swinging Bridge is another photo spot along the Southside Dr during your 2 days in Yosemite. It’s about a 15 minute walk from Shuttle Stop 11, and another 15 to 20 minute walk to the boardwalk I mentioned earlier.
The bridge is one attraction and it does give you a nice view of the surrounding area and Yosemite Falls. Despite the name, the bridge does not swing as the original swinging bridge was damaged by flood in 1964.
Besides the bridge, this area is a nice place to just relax and enjoy the scenery. There are picnic tables, grills and chairs and since it’s along the Merced River, you can get into the water on a hot day.
Sunset at Tunnel View
Finish your day at Tunnel View, the most famous viewpoint in Yosemite National Park. You will need to have a car to drive here and I suggest coming here at least 20-30 minutes before sunset to get a parking spot.


Ideally, you want to drive through the Wawona Tunnel and see the view as you emerge from the tunnel, but coming from the Yosemite Valley, you will see the parking lot for Tunnel View just right outside of the tunnel.
The Tunnel View area gets packed all day everyday because of its ease of access, and it really has an amazing view of the park. From the Tunnel View viewpoint, you can see all the major granite peaks lining up on both sides, including Half Dome, El Capitan, Sentinel Rock, Bridalveil Fall and Cathedral Rocks.
Just keep in mind that you may not always get the perfect colorful sunset (well, we didn’t). The view is beautiful regardless. In addition, if you really want to avoid the crowd, you can always hike up to Artist Point for a very similar view but without the crowd.
We almost hiked up to Artist Point for sunset but we were too tired and it was good we didn’t because it literally thunder stormed right after sunset.
This concludes your first day of your two day Yosemite trip itinerary.
Day 2 in Yosemite: Glacier Point Area, Sentinel Dome, Taft Point
Your second and last day in Yosemite is going to be another early day (you don’t have to if you don’t want to though).
Depending on where you are staying, this could mean a very early day for you (we got up at 3:30am and you will see why).
On your second day in Yosemite, you will leave the Yosemite Valley and explore the 2nd most popular area in the park: Glacier Point. You will most likely need a car for this day but there is an option for a paid Glacier Point Tour.
Sunrise at Glacier Point
Glacier Point is an iconic photo spot in Yosemite with a direct view of Half Dome. Since Glacier Point has a higher elevation (at about 3214 feet), you will be seeing Yosemite Valley, Yosemite Falls and other mountains from above.
Stunning views are not the only reason why Glacier Point is popular, it is because you don’t need to hike to get the best view in the park. There are a couple of parking lots at Glacier Point, so you can literally just drive up there.


Glacier Point is only accessible from May to November, as Glacier Point Road is closed to cars in the winter. It takes about an hour to drive to Glacier Point from Yosemite Valley.
While you can visit Glacier Point at any time of the day, most people come to Glacier Point for sunset and very few make it for sunrise. However, sunset can be super crowded there and it’s really hard to get a good photo. Besides, if you are leaving Yosemite at the end of the day, you may not want to wait till sunset.
Personally, I think Glacier Point is amazing for sunrise. I didn’t know what it looked like before I got there and I was surprised to find the sun rising directly behind Half Dome, talking about epicness!
Most of Glacier Point has railing around it, making it a super safe viewpoint. There are of course areas without railing, so just be careful if you do want to wander off.


There are a couple of points of interest at Glacier Point:
- Glacier Point Amphitheater
- Glacier Point Trailside Museum
- Geology Hut
There are also a number of hiking trails at Glacier Point:
- Four Mile Trail to Yosemite Valley
- Panorama Trail to Yosemite Valley
- Pohono Trail to Wawona Tunnel
Glacier Point Road

After sunrise, take the short path through the woods to another photographer’s favorite spot: the turn on Glacier Point Road. You may have seen this photo all over Instagram and this spot is literally a 5-7 minute walk from the Glacier Point parking lot (park at the upper lot since it’s closer).
I would only recommend taking photos here before 8:30am (better if 8am) because there aren’t many cars that early. But around 8 or 8:30 in the morning, more and more cars start driving up. It would be nearly impossible to get this photo later in the day as cars come and go from both directions.
Washburn Point

Less than a mile from Glacier Point is another beautiful but lesser known viewpoint, Washburn Point. There is a small parking lot at Washburn Point so you can just drive there and see the view.
The view is similar to Glacier Point but with a lot less people!
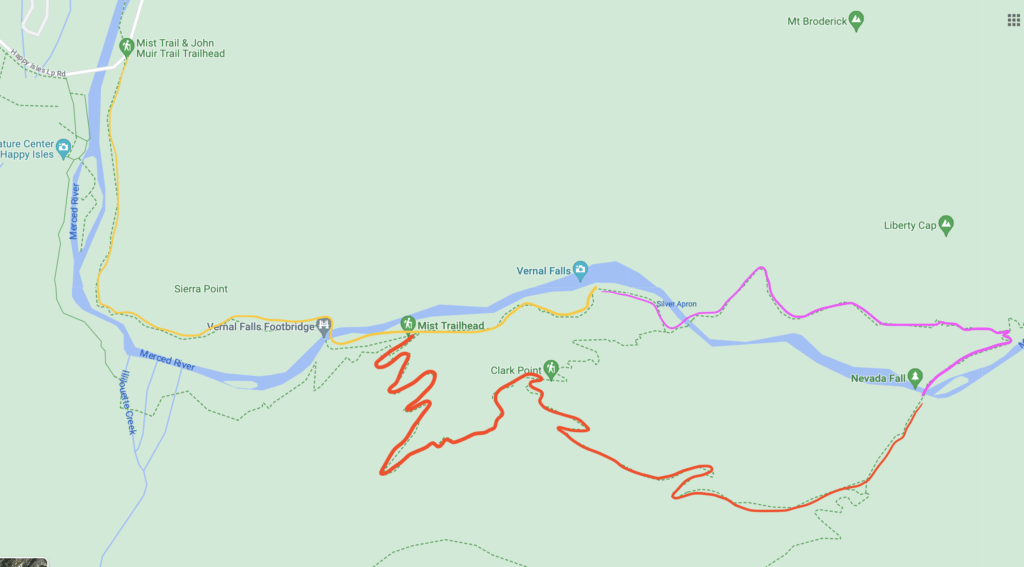
Sentinel Dome & Taft Point
From Washburn Point, driving another 10 minutes or so will bring you to Taft Point Trailhead (which is also the trailhead for Sentinel Dome).
You don’t need to hike to Sentinel Dome if you are not a hiker, but I still think it’s worth the walk to Taft Point, another famous viewpoint in Yosemite National Park.
But if you don’t mind hiking, I would highly suggest adding the Sentinel Dome/ Taft Point hike to this 2 day Yosemite itinerary. The reason is that both offer an amazing view and photo opportunity and the hike itself is not too hard.

- Taft Point (teal color): 2.2 mile round trip with 350 ft elevation gain
- Sentinel Dome (orange color): 2.2 mile round trip with 450 ft elevation gain
- Sentinel Dome and Taft Point Loop (all 3 colors): 5 miles with about 1100 ft elevation gain


If you only want to see Taft Point, it’s a very easy 2.2 mile round trip. The best view at Taft Point is from the viewpoint with railing, where you can see El Capitan, the Valley and the rock that sticks out (where many people stand to get their photos taken).
Sentinel Dome is also a pretty easy hike by itself and you will be rewarded with a nice view of Half Dome as well as Yosemite Valley.


If you combine the two hikes into a loop, it is a bit more challenging with higher elevation gain. There were some steeper parts on the hike that made me go out of breath. We did Taft Point first because we were worried there would be too many people later in the day.
But if you are not worried about taking photos of yourself at Taft Point, it is easier to hike to Sentinel Dome first then go to Taft Point. The whole loop will take you 2-3 hours to complete.
You can read my detailed Taft Point Sentinel Dome Loop Hike guide if you want to hike this loop.
Tunnel View

If you didn’t get to come to Tunnel View for sunset yesterday, you can do Tunnel View today. Since you will be coming from Glacier Point Road, you will actually be coming out of the Wawona Tunnel this time with the view emerging at the end of the tunnel. This is how this viewpoint got its name and that “reveal” is truly stunning.
Lunch: Yosemite Village
If you want cooked food, drive back to Yosemite Village. On Day 1 I recommended eating at Village Grill, so today you can try the other restaurant, Degnan’s Deli.
There are seating inside, if you want AC, or you can bring it outside to eat.
Afternoon Option 1: Yosemite Valley Again
If you didn’t get a chance to see all the viewpoints yesterday, you can do them today.
In addition, you can check out the welcome center, Indian Village of Ahwahnee, Yosemite Museum, and The Ansel Adams Gallery at Yosemite Village.
Afternoon Option 2: Mariposa Grove
Another option is to explore the southern part of Yosemite National Park. Mariposa Grove is a famous area with over 500 giant sequoia trees. You will need to take a shuttle from the Mariposa Grove Welcome Plaza to the grove from April 1 to November 30th. There is no free shuttle from December 1 to March 30th. The road (when it’s open) only allows cars with disability placards.
Mariposa Grove is easy to visit for everyone, as there are really short and easy walks to see the giant sequoias. There is also a 2 mile loop that allows you to see more, including a 3000 year old sequoia tree. There are also a couple of 6-7 mile long hikes that you probably won’t be doing on this itinerary.
And this concludes your two day Yosemite trip!
Is 2 Days in Yosemite Enough? How Many Days Do You Need For Yosemite?
As you can see, there are a ton of things you can do in Yosemite and two days really forces you to cram in a lot of things.
With two days in Yosemite, you can only visit the most popular areas of Yosemite Valley and Glacier Point. If you start the day early, you can include a hike or two. Two days in Yosemite is enough for those that don’t really want to hike and just want to check out different viewpoints.
If you are an avid hiker, I would recommend at least 3 to 4 days in Yosemite, especially if you plan to do Half Dome, which takes an entire day and will leave you sore for days after. Besides Half Dome, some other famous hikes in Yosemite include:
- Mirror Lake
- Upper Yosemite Fall
- Cloud Rest
- Four Mile Trail
You will need at least 3 days to see other parts of the park, such as Tuolumne Meadows to the east of Yosemite National Park. You could try to visit it in 2 days, but it is quite a far drive and you will really be running from viewpoint to viewpoint with little time to enjoy the scenery.

Where to Stay in Yosemite for 2 Nights
The best place to stay in Yosemite is at one of the park’s lodges, in the Yosemite Valley. If you can’t book a lodge inside the park, you can consider staying outside of Yosemite, in Wawona, El Portal, Oakhurst, and Mariposa.
Staying Inside Yosemite National Park
There are a number of lodges managed by the Yosemite National Park. These are the best places to stay because it saves you so much on travel time. However, a reservation is hard to get as they get booked up super fast (reservations are available 366 days in advance). If you are the last minute type of person, you probably won’t be able to get them unless someone cancels at the last minute.
The lodges in Yosemite Valley include:
- The Ahwahnee: the only luxury hotel inside the park. It is open all year-round.
- Yosemite Valley Lodge: a traditional lodge that is right next to Starbucks and a couple of restaurants. It is open all year-round.
- Curry Village: lodging with standard rooms, cabins, and tent cabins in Curry Village. It is only open seasonally.
- Housekeeping Camp: a camping experience but without you setting up the camp yourself. It is only open seasonally and you probably need to bring a sleeping bag as reviews say the bed cover is not enough.
There are a couple of other lodges inside the park, but located near Tuolumne Meadows and Mariposa Grove.
The legit website to book lodging inside Yosemite is this website and Expedia. But if the lodging is not available on these two websites, don’t use other random third party sites even if they show availability, as those can be scams.
Besides the lodges, there are a number of campsites available inside Yosemite. I am not a camping type of person so I don’t have too much knowledge on camping, but you can find out more on the official website.
Staying Outside of Yosemite National Park
Most visitors will probably end up staying outside of the park since not everyone can get a reservation at those lodges. There are a number of small towns (or bigger towns) that you can stay at near the park.
- El Portal: the closest small town to Yosemite Village (about a 25 minute drive)
- Mariposa: A larger town about an hour drive to Yosemite Village (2 hours drive to Glacier Point)
- Wawona: Located near the south entrance of Yosemite, about an hour drive to Yosemite Village or Glacier Point
- Oakhurst: A larger town about 1.5 hour drive to Yosemite Village and Glacier Point
The closest town to Yosemite Valley is El Portal, about a 25 minute drive to Yosemite Village. The best places to stay in El Portal are Yosemite View Lodge and Cedar Lodge.
Those tend to get booked up pretty fast as well, so if they are, you will need to expand further out to the other towns mentioned above.
We personally stayed at Mariposa Lodge and the Oakhurst Inn. Both were clean and sufficient but they were further from the park. We booked the trip about a month out so these towns were our own options.
Another option to stay at is AutoCamp, which is a luxury glamping type of accommodation about an hour from Yosemite Village. They have raving reviews so if you are into that, you can check them out too.
Before booking any hotel, make sure to check how long it would take you to get to Glacier Point and Yosemite Village. Booking the wrong hotel can add an hour to your drive.
We booked 2 hotels in 2 different towns because we were going to visit Yosemite Valley from Mariposa and Glacier Point from Oakhurst. However our plans changed at the last minute due to a forecasted storm, so we had to visit Glacier Point from Mariposa, which added 1 hour to the drive (making it 2 hours). We did it for Glacier Point sunrise too, so we literally had to wake up at 3:30am, not fun.
What to Pack for 2 Day Trip to Yosemite
2 nights in Yosemite is not a very long time, but since it’s a national park, you want to be adequately prepared, especially if you are planning to hike (not including Half Dome since that requires a whole separate packing list).
- External Phone Battery: You will be out and about all day and you will probably use your phone for photos and videos. Do yourself a favor and bring an extra battery, so you don’t need to deal with a dying phone by 2pm.
- Hydration Pouch and Hiking Back Pack: If you plan to hike in Yosemite, especially the entire Mist Trail, you want to be prepared. Bring 2-3 liters of water, snacks, and a hiking backpack to make the hike more comfortable.
- Sunscreen, hat, sunglasses: Yosemite can be very hot and sunny in the summer, so you should be prepared for sun protection. I always use mineral sunscreens like this (not greasy at all), since they are better for you and better for the environment.
- Hiking Shoes: You don’t necessarily NEED hiking shoes but I highly recommend having these waterproof ones for the Mist Trail. You can get completely sprayed on that hike and the steps can be super slippery.
- Park Pass & Timed Reservation: you won’t be able to get into the park without these.
- Head Lamp: If you are planning to hike later in the afternoon or hike to Artist Point for sunset, you need head lamps so you don’t have to hike down in the dark with your phone flashlight.
- Credit Card: The entrance booths at Yosemite only take credit card or mobile payment. If you didn’t book your Park Pass online and want to buy them at the gate, you will need those.
- Insect Repellent: Bugs can be an issue during the summer around sunset or in the woods in Yosemite. Bring bug spray with you so you don’t get bitten unnecessarily.
- Toiletry, Underwear, Change of Clothes, etc: Don’t forget the basic stuff you always bring on a trip!

Q&A On Yosemite National Park
What’s the best time to visit Yosemite?
May and June are the best time to visit Yosemite if you want to avoid the crowds, see powerful waterfalls and hike. July and August can see good water flow for waterfalls (depending on the year) but these months are the most crowded and expensive in Yosemite.
The fall months of September and early October are also a good time to visit Yosemite, as you will see cooler weather, beautiful foliage (more October) and less people around.
Winter is beautiful in Yosemite, especially if you want to snowshoe, but many parts of the park are closed for vehicles (like Glacier Point).
Can you drive in Yosemite?
You can definitely drive in Yosemite, but it is advisable to take the free park shuttle during peak summer months in Yosemite Valley.
Parking can be difficult during peak summer months in Yosemite, especially in Yosemite Valley and at different viewpoints. You should always arrive early (by 7 or 8am) if you want to find parking easily.
Are there restaurants in Yosemite?
You will find many restaurants in Yosemite Valley, such as Dregnan’s Deli, Village Grill, The Ahwahnee Dining Room, the Mountain Room, Curry Village Pizza Deck, etc.
There are also dining options in Tuolumne Meadows, and a snack stand at Glacier Point.
Are there gas stations in Yosemite?
You won’t find gas stations inside Yosemite National Park, but there are gas stations in nearby towns, like in El Portal.
Is it scary to drive in Yosemite National Park?
There are some roads in Yosemite that are next to a cliff, making it scary to drive on, especially in a storm. We drove during a thunderstorm after sunset at Tunnel View and it was probably one of the scariest drives of my life (and I have driven in Maui, the Dolomites, New Zealand, and Banff).
To me, Hwy 140 was the least scary with lower elevation gain. Hwy 120/ New Priest Grade is more scary.
Do you need bear mace in Yosemite?
Unlike Banff and Jasper, you cannot bring bear spray/ bear mace to Yosemite as it is not allowed. Since Yosemite is quite crowded and trails have so many people, bears are not as big of a threat as in other national parks. However, if you do see a bear, be sure to follow instructions on the official website to stay safe.
Can you bring a drone to Yosemite National Park?
No, drones are not allowed in national parks.
I did see a drone when I was at Taft Point, which was very annoying. Don’t be disrespectful and ruin other people’s experience please.
Read my Other Yosemite Blogs
My other national park guides:
- Mount Rainier National Park
- North Cascades National Park
- Grand Canyon National Park
- Acadia National Park
- Banff National Park
- Jasper National Park
- Yoho National Park
Like this post? Pin this 2 day Yosemite itinerary to Pinterest!

